Watch the Installation video here
Author Archives: peteshack
Announcing the all new web-based Excellerate Atom
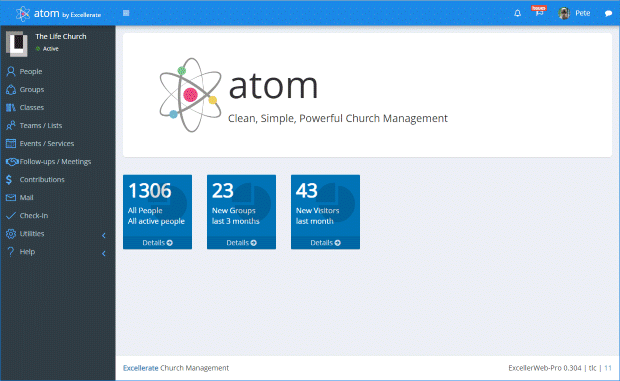
Atom = Simple + Powerful
Atom was designed to give you all of the power, features and flexibility your church needs, in a clean, simple, extremely easy-to-use design.
Yes, there are “simple” solutions out there, but they lack the features and flexibility your church needs.
Yes, there are “powerful” solutions out there, but they are way too complicated, require weeks of training, and are frustrating to use.
Multiple computers using Excellerate Desktop over your network
If you have the Excellerate Desktop solution, you can share your database from a server or “main” computer that’s always on. You would need the multi-user network option for this.
Each workstation would have the Excellerate program installed, but would open the database from the server or main computer. For this solution, the computers would need to be connected to your church network – preferably a wired network. Wifi networks can drop out and cause database problems.
If you have really strong, reliable Wifi, and you don’t move your laptops while using Excellerate, you might be able to use wifi, but make sure you take frequent back ups just in case. Also make sure the wireless computer’s wifi connection is set to PRIVATE, not public.
First, share your Excellerate folder from the main database computer over the network
Typically you should consult your IT person about sharing information across your network, but if you don’t have an IT person, here are the basic steps:
- Share your c:\Excellerate folder on the main computer that holds the Excellerate database. Here’s one how-to article: https://pureinfotech.com/setup-network-file-sharing-windows-10/
- Make sure users have full read,write,delete access to the c:\excellerate\ folder
- Write down the address listed in the window, for example: \\DESKTOP-VMN9GIN\Excellerate
Next, install Excellerate on your other computer
Tell the other computer to open the Excellerate database from the main computer share
- Start Excellerate on the other computer, and if prompted, choose “Open other database” (If you don’t see that option, you can go to the File menu, and choose Open Database)
- Now, you need to open the database from the main computer, so you should enter the full path to the main computer. For example: \\DESKTOP-VMN9GIN\Excellerate
(Note – if you get an error trying to access that folder, it means you don’t have sharing set up correctly, or you don’t have the correct user id & password to access the share. You will need to further investigate your steps for sharing.)
- When you open that path, you should see your database file, possibly called “database” or “database.mdb”. Or you may have called the database something else when you created it.
- Log into Excellerate, and answer YES to the prompt “Make this your default database?”
That’s it. Now both computers can access the same database.
Adding a logo to contribution statements
Here’s how to add your logo to the contribution statements.
For best results, make your logo 108 pixels tall and save it as logo.jpg
If you can’t do that, it will still work, but may not look as good.
In Excellerate go to Reports, Members, Member Contribution Statements
-Find the style “Full page with logo”, and hit the Modify button.
-You’ll see a square at the top for the logo, that says “PICTURE:…”
-Click in that square, and then in the “fx” field above, change it to:
PICTURE:’c:\excellerate\logo.jpg’
-Close the report and save it with a new name
-Put your logo in the c:\excellerate\ folder, and it must be called logo.jpg
Preview the report, you should see your logo. You can modify the report and adjust the size if needed.
Set up Texting in Excellerate
Excellerate has the ability to send text messages to your members and pre-members. You can send texts to an individual member, or to an entire view of members.
To send texts, you first purchase a block of text credits from our website. If you buy 100 credits, then you can send 100 text messages. Credits never expire, so you can keep them as long as you want.
You will first need to set up your texting account
To set up texting in Excellerate, Go to the Options menu, Preferences, Texting Options.

From here you can hit “Create my account”. This will take you to the order page on our web site, where you can log in, and purchase some text credits.
Scroll down to the middle and find “Excellerate text credits” and order some credits, and check out. This will create your texting account, and you will get the following email:
Your new Excellerate texting account is ready to go!

Next, enter the following account settings in Excellerate.
Go to the Options menu, Preferences, and click "Texting Options."
Enter the following:

Text Server: http://text.excellerate.com
Username: xxxxxx
Password: xxxxxx

You can use the "Manage My Account" button to do the following:
Add more text credits
View your text messages
Cancel a bulk send
Change your password
Simply enter that information in the screen above, and you’re ready to start texting
Deleting Members
When you delete a member in Excellerate, you’re really just flagging it for delete in the future. We do this so that when you delete someone, you have some time to recover in case you made a mistake, or the person starts attending again.
When you’re ready to permanently remove those members, you just need to go to the Utilities menu, Maintenance, Remove Old Records.
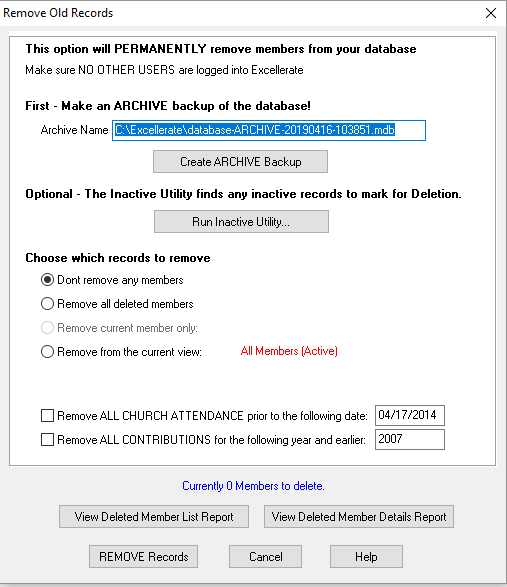
Typically, you would “Create ARCHIVE backup”, and then choose “Remove all DELETED members”, then hit “REMOVE Records”
There are many options in this screen, so for more information, you can also check the built-in help for “Remove Old Records
Just be careful about the options you choose, because you could remove all of your members.
Church Check-In – Simple, Clean, Portable
Enjoy the simplicity of a complete mobile check-in solution for your church!
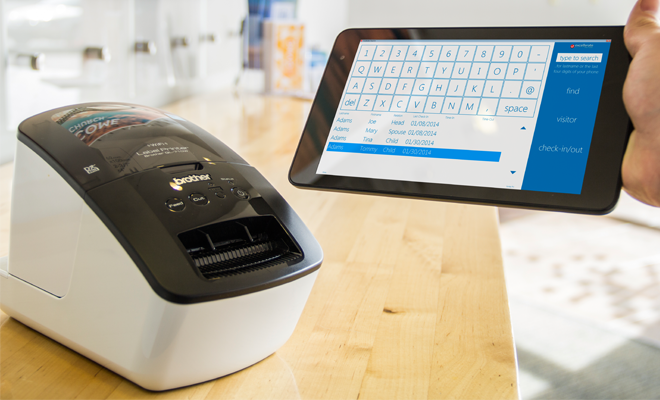
Our portable check-in tablets allow you to easily check-in your children, members and volunteers wherever you are – Internet NOT required. The information can be stored on the tablet, or synced to a main computer with a USB stick. Continue reading
Setting up multiple check-in stations
With one check-in station, the database and the check-in program are usually running on the same computer, so everything easily stays in sync.
If you want to run an additional check-in station, you must decide how it will sync to the main database (located on another computer).
There are several ways of syncing the additional station.
Automatic over a WIRED network connection
The best solution is using a WIRED network connection between the check-in stations and the main computer with the database.
In this method, there is no “syncing” involved, because the check-in station talks directly to the database over the wired network. Changes in the database are immediately reflected in the check-in station, and vice versa.
This is really only recommended for wired connections. Wifi connections can drop and this can damage your database.
If you have really strong, reliable Wifi, and you don’t move your check-in station while connected, you might be able to use this method over wifi, but make sure you take frequent back ups just in case.
- Share your Excellerate folder from the main database computer over the network
Typically you should consult your IT person about sharing information across your network, but if you don’t have an IT person, here are the basic steps:
-
- Share your c:\Excellerate folder on the main computer that holds the Excellerate database. Here’s one how-to article: https://pureinfotech.com/setup-network-file-sharing-windows-10/
- Write down the address listed in the window, for example: \\DESKTOP-VMN9GIN\Excellerate
- Set the check-in stations to “online” mode, and connect to the shared database
- On the check-in computers, see if you can access the shared folder by going to your start button and enter the share path (for example: \\DESKTOP-VMN9GIN\Excellerate )
- You may have to enter an ID & PW (save password)
- You should see your Excellerate files
- Now set your check-in station to Online mode:
- Start check-in, go to the Options tab, and choose “Online”
- Hit “Open Different Database” and choose your database from the \\DESKTOP-VMN9GIN\Excellerate folder
- Restart check-in
Manual sync with a USB stick
If you don’t have any network access, you can sync the check-in stations manually using a USB stick.
In this method, you load up a USB stick with data from the main database, and insert it into the check-in station to operate. At the end of the day, you bring the USB stick back to the main computer and sync your data.
-
- Insert your USB stick in the main database computer
- Go to Utilities menu, Synchronize Check-In Stations
- Make sure you set the “Path for attendance files and offline database” to your USB drive letter (example E:\ )
- Hit “Import offline attendance” to import any attendance data from the USB
- Hit “Export latest information for offline use”
- Insert the USB stick in the check-in computer
- Start check-in, and go to the Options tab, and make sure “Station Mode” is Offline
- Set the “Transfer path” to the drive letter of the USB stick (letter may be different on this computer)
- Restart the check-in program
Now each week, just make sure the USB stick is in the computer before starting check-in, and after check-in is complete, take the USB stick back to the main computer and sync as described above.
Manual sync over WIFI using a network share
If you have wifi available to your computers, you can sync over wifi and not use a USB stick.
When you use the “Synchronize check-in Stations” feature, you’re just reading/writing to a network share instead of USB.
-
- Share your Excellerate folder from the main database computer over the network (See instructions above)
-
- Create offline database and transfer folder
- On the main database computer, go to Utilities, Synchronize Check-In Stations
- Set the “Path for attendance files and offline database” to c:\excellerate\transfer
- Hit “Export latest information for offline use”
- Create offline database and transfer folder
-
- Set the check-in stations to “offline” mode, and connect to the shared folder
- On the check-in computers, see if you can access the shared folder by going to your start button and enter the share path (for example: \\DESKTOP-VMN9GIN\Excellerate )
- You may have to enter an ID & PW (save password)
- You should see your Excellerate files
- Now set your check-in station to Offline mode:
- Start check-in, go to the Options tab, and choose “Offline”
- Enter the share path in “Transfer Path / Cloud”. Example: \\DESKTOP-VMN9GIN\Excellerate\Transfer
- Restart check-in
- Set the check-in stations to “offline” mode, and connect to the shared folder
Now each week, you simply have to run the “Synchronize Check-In Stations” feature from the main database computer. Make sure you first hit “Import offline attendance files”, then hit “Export latest information for offline use”
Manual sync over WIFI using cloud storage like Dropbox, or Onedrive
If you have wifi, but are unable to create a network share, you can use a cloud storage service as the transfer path.
- Setup Dropbox, Onedrive, etc on the main database computer, and the check-in stations. Make sure you use the same account.
- Create offline database and transfer folder
- On the main database computer, go to Utilities, Synchronize Check-In Stations
- Set the “Path for attendance files and offline database” to your dropbox or onedrive path, for example: C:\Users\Pete\OneDrive\Excellerate
- Hit “Export latest information for offline use”
- Set the check-in stations to “offline” mode, and connect to the cloud storage folder
- On the check-in computers, make sure you can see the Excellerate folder and files in the cloud storage folder
- Now set your check-in station to Offline mode:
- Start check-in, go to the Options tab, and choose “Offline”
-
- Enter the share path in “Transfer Path / Cloud”. Example: c:\Users\Checkin\OneDrive\Excellerate
- Restart check-in
Now each week, you simply have to run the “Synchronize Check-In Stations” feature from the main database computer. Make sure you first hit “Import offline attendance files”, then hit “Export latest information for offline use”
Automatic sync over WIFI using a network share or cloud storage
It’s possible to get the “Synchronize Check-In Stations” process to run automatically, every 10 minutes or so. This way you don’t have to manually run it yourself. This involves installing a special service on your main computer.
- Share your Excellerate folder from the main database computer, or use a cloud storage solution as described above
- Create offline database and transfer folder as described above
- Set the check-in stations to “offline” mode and connect to the shared folder or cloud storage folder as described above
- Install the check-in service (the main computer must have an id & pw)
- From the main database computer, go to Utilities, Maintenance, Check-In Sync Service
- Set the “Transfer Path” to your shared folder or cloud storage folder
- Set the “Real time sync interval” to 10 minutes
- Hit “Install Scheduled Task” button at the bottom. You will need to enter the computer password
Now when the check-in stations are done at the end of the day, they will send the attendance info to the main computer. The main computer will automatically sync the data ever 10 minutes.
Please contact support if you have any questions
7 Habits of Highly Effective Churches

These habits come from the best practices we’ve seen in the healthy, growing churches that we’ve worked with over the past 15 years. Not only have we been helping other churches, but I’ve been fortunate to also help start and grow our local church through all of its stages – from 30 people in a temporary facility to now over several thousands of people in multiple campuses! I’ve been both on the outside, helping with the administration of these practices, but also on the inside – working through all of the many details in our local church as well. So it’s a privilege to bring these habits and practices to you and your church. Continue reading
Sending Emails from Excellerate
You can send emails directly from Excellerate by entering your email provider’s settings. You simply enter the SMTP server settings (non SSL) into Excellerate’s email preferences screen. If your email server requires SSL, see the section below for Gmail/Outlook/Office365.
A couple of things you should be aware of…
Mass Emailing
You can send emails to individuals or mass email to a large group of people. When you are sending lots of emails to a large number of people, from any system, it can look like you are “spamming”. When email providers see this type of activity, there is a chance that you could be added to a black-list. This means more and more of your emails will get caught in junk/spam folders instead of reaching your members. So you would want to be careful if you are sending these emails from your church’s main email account.
This issue is not specific to Excellerate, it applies to any email sending program.
The best practice for sending large amounts of emails, is to use an email service that specializes in delivering mass emails, and works to protect from blacklisting. Some of these services include:
Using Gmail / Outlook / Office365 to send emails from Excellerate
If you do decide to use your church’s main email service, and you won’t be sending mass emails, you will need to perform one additional step if you are using gmail.com, outlook.com, office365.com.
Many of the free/mainstream email services such as gmail.com, etc… require special authentication (to prove you’re not a spammer). To use these services with Excellerate, you will need to download a small utility that allows Excellerate to communicate with these services using SSL.
- Download and install Stunnel: https://www.stunnel.org/downloads.html
Choose the win64-installer.exe version.
(When installing, accept all the defaults and you can simply press enter for all of the questions)
- In your start menu, search for “stunnel service install” and run it.
- In our Start menu, search for “stunnel service start”
Gmail – Note, for gmail, you need to setup an app password. see the following links:
https://support.google.com/mail/answer/185833?hl=en
If you don’t see “Add app password”, try this link: https://myaccount.google.com/apppasswords
Now, start Excellerate and enter the following under Options, Preferences, Email Options.
- Outgoing SMTP Server: localhost
- SMTP Port: (25 for gmail)
- SMTP Authentication: Login
Finally, enter your email UserName and App Password
That’s it, you should be able to send emails from Excellerate!