
Importing Online Giving into Excellerate
Excellerate and Atom are able to import online contributions from most online giving services. Here is a list of those services, but email us if you have a different service you would like to import from.
- Secure Give
- TransactU
- Giving Kisosk
- Generic Excellerate
- Clover
- Kindred
- Txt2Giv
- PushPay
- MinistryLinq
- SubSplash
- GivingFire
- Tithely
- PlanningCenter
- RebelGive
- Stewardship Tech
- CDM
The process includes:
- EXPORTING the donations from the service to a file
- IMPORTING that file into an Excellerate contribution batch
Configure Excellerate and your online service
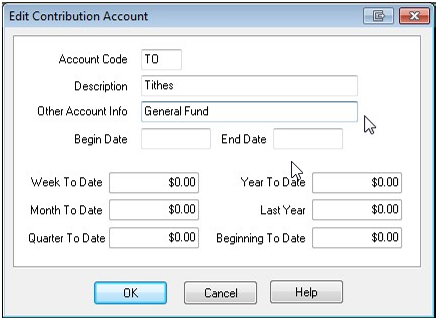
As each donation is imported, Excellerate will try to match the donation’s account or fund with Excellerate’s account. To do this, you must enter the online service’s account names into Excellerate’s accounts in the “OtherAccount” field. In the following example, the online fund is called “General Fund”:
Also, as each donation is imported, Excellerate will try to match the donor with the Excellerate member.
Each service provides different donation information, so the matching process depends on which service
you use:
Authorize.net, Secure Give, Giving Kiosk, PushPay, Kindrid, SubSplash, Tithly, Planning Center, Stewardship Technologies – In these services, you can store the Excellerate MemberID in the donor record of the giving service. In some cases, you can fill in the missing Member IDs during the export process.
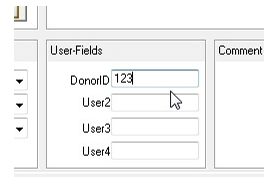
GivingFire, Txt2Give – Allows you to store the Excellerate MemberID in the donor record, or you can store the Txt2Give ID in the “User1” field (see screenshot below)
MinistryLINQ – Allows you to store the Excellerate Envelope# in the MinistryLINQ donor record. If the envelope# is not found, the email address will be used to find the member.
Clover Donations – You must store the Clover Donation ID in the Excellerate Member’s record in the “DonationID” or “User1” field:
Export donations from the service
Now that you’ve assigned account names and member/donor IDs, the first step in your weekly importing is to export the donations from your online giving service. Each service is different, but you can usually export a date range of donations to a text file (.txt or .csv). Some services will have a built-in export format called “Excellerate”, but most services will just have a generic donation export.
Save the export file to your desktop
Import donations from the export file
In Excellerate, open a batch and hit the “Import Contributions” button:
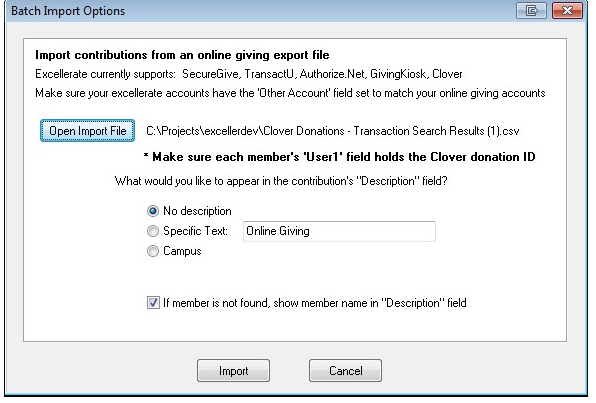
Next, hit “Open Import File” button and locate the export file on your desktop
Note – Excellerate Cloud users – to find the file on your desktop, after you hit “Open Import File”, you will need to navigate to the “Client C (M:)” drive, then select Users, your-user-name, Desktop to find your local Desktop.
Next, choose any import options and hit “Import” button
Each donation will be imported into the batch.
When Excellerate is unable to match a donor to a member, either the IDs were not set up, or you have a brand new donor, the contribution will not be assigned to a member and would get recorded as “loose cash”. To assign the correct member, you can double-click the contribution and choose the correct person. You could also edit the Member record and assign the DonorID (for Clover Donations service)